
- Part III, of the Mass Mailer integration series, see also:
Integration Tutorial and Code
Overview
Introduction
Congratulations on making it this far in the article ! That is if you managed to wade through the first 2 segments. And if you skipped ahead to this section; Thanks for checking out my sample app and implementation guide.
In the previous section ( Part II) We discussed the details about the application architecture, and certain design choices. Of course the idea here is to provide you, the reader with several loosely coupled application blocks, so you can take out whatever nuggets might be useful for whatever project you’re currently in.
The format of implementation is a tutorial style, sample app to illustrate te concepts. I intend to make a
small demo video so you can see it in action as well. As well as share the code on Github. Which I haven’t had time
for yet.
screenshot:
The purpose of the sample app is to illustrate concepts, as concise as possible. And as such most of the code is very verbose, doesn’t contain error checking, and sometimes deliberately takes the ‘long road’. Which means we don’t use an ORM (Object Relational Mapper) like Prisma and use a library as close to native Postgresql as possible (Node pg in this case).
Hence it is not
intended to function 1:1 like this in production environments.
Last but not least, in this piece I’ll just highlight specific items that were typical pitfalls or challenges of
some sort. This for the sake of brevity.
I use the app myself as a convenient tool for processing leads in and around campaigns. And find it quite useful. Your mileage may vary.
The idea is to help you along the way, take any concept/implementation you might find useful and build your own functionality around it. Everything is under MIT license. Source attribution is appreciated, but not necessary.
Database
We’ll start with the Postgresql, the why’s et al. Have been discussed in the previous (Part II) section. In retrospect Postgresql is certainly more demanding then using something like MongoDB. But you get a very fast, scalable database in return. ( A Postgres cluster can contain multiple 32TB databases, just in case you have a lot of leads ) I’ve opted to run the database locally in Docker, using the standard Docker Postgresql template. [insert link].
And since I have very little Postgresql skills, I wrote the tabledefs in a separate file and executed these directly in a Postgresql terminal ( In Docker you can go to the exec/cmd screen and execute all the Postgresql code ).
The PG Database code is stated hereunder. I used PGAdmin to create additional user accounts etc. And run validation queries.
If you’re not a fan of RDBMS’ or simply want to save yourself the agony of casting variables feel free to use MongoDB etc. *Note that all the queries etc. in the rest of the implementation will have to be modified accordingly.
NodeJS Middleware
Now that our Database is up and running. Let’s set up Node. I don’t use the provided scaffolding as it’s not my kind of structure. So just create a new project and install :
- Express
- Express-handlebars
- dotenv
- bodyparser
- Express-session
- memorystore
- pg
- Axios
- JSForce
The app structure is kept as simple as possible. As follows :
    App (axios1)
    /lib
        db.js
        handlers.js
    /views
        /layouts
    /public
        /img
As long the files are not on github they can be found here:
Notable points
In page updates with Handlebars
To display results in the UI we use pre-compiled handlebars sections that are
(re)build whenever the relevant data changes. This way we can have
server side templating but still update selected data rich elements in the page,
without reloads.
The way it works is as follows. (from handlers.js)
We create a handlebars template string. And then
compile it as with the handlebars library.
Axios1
Mass contact creation
Since Mailoctopus doesn’t allow for bulk creation of updates. We have to call CreateContact
for each contact. Minimum data is email, name, listID. This is handled by an Axios
PromiseAll function.
Note that for the purposes of this demo app we didn’t implement an
explicit bulkified function, that maxed the new contact calls at the rate limit. However
it wouldn’t be a major addition.
The rate limit is about 100calls per second. Hence we can space out the CreateContact calls in 100 contact blocks with a 1 second delay to be sure. This is left as an exercise for the reader.
Database Integration
We use standard pg functionality to connect and query our Postgresql database.
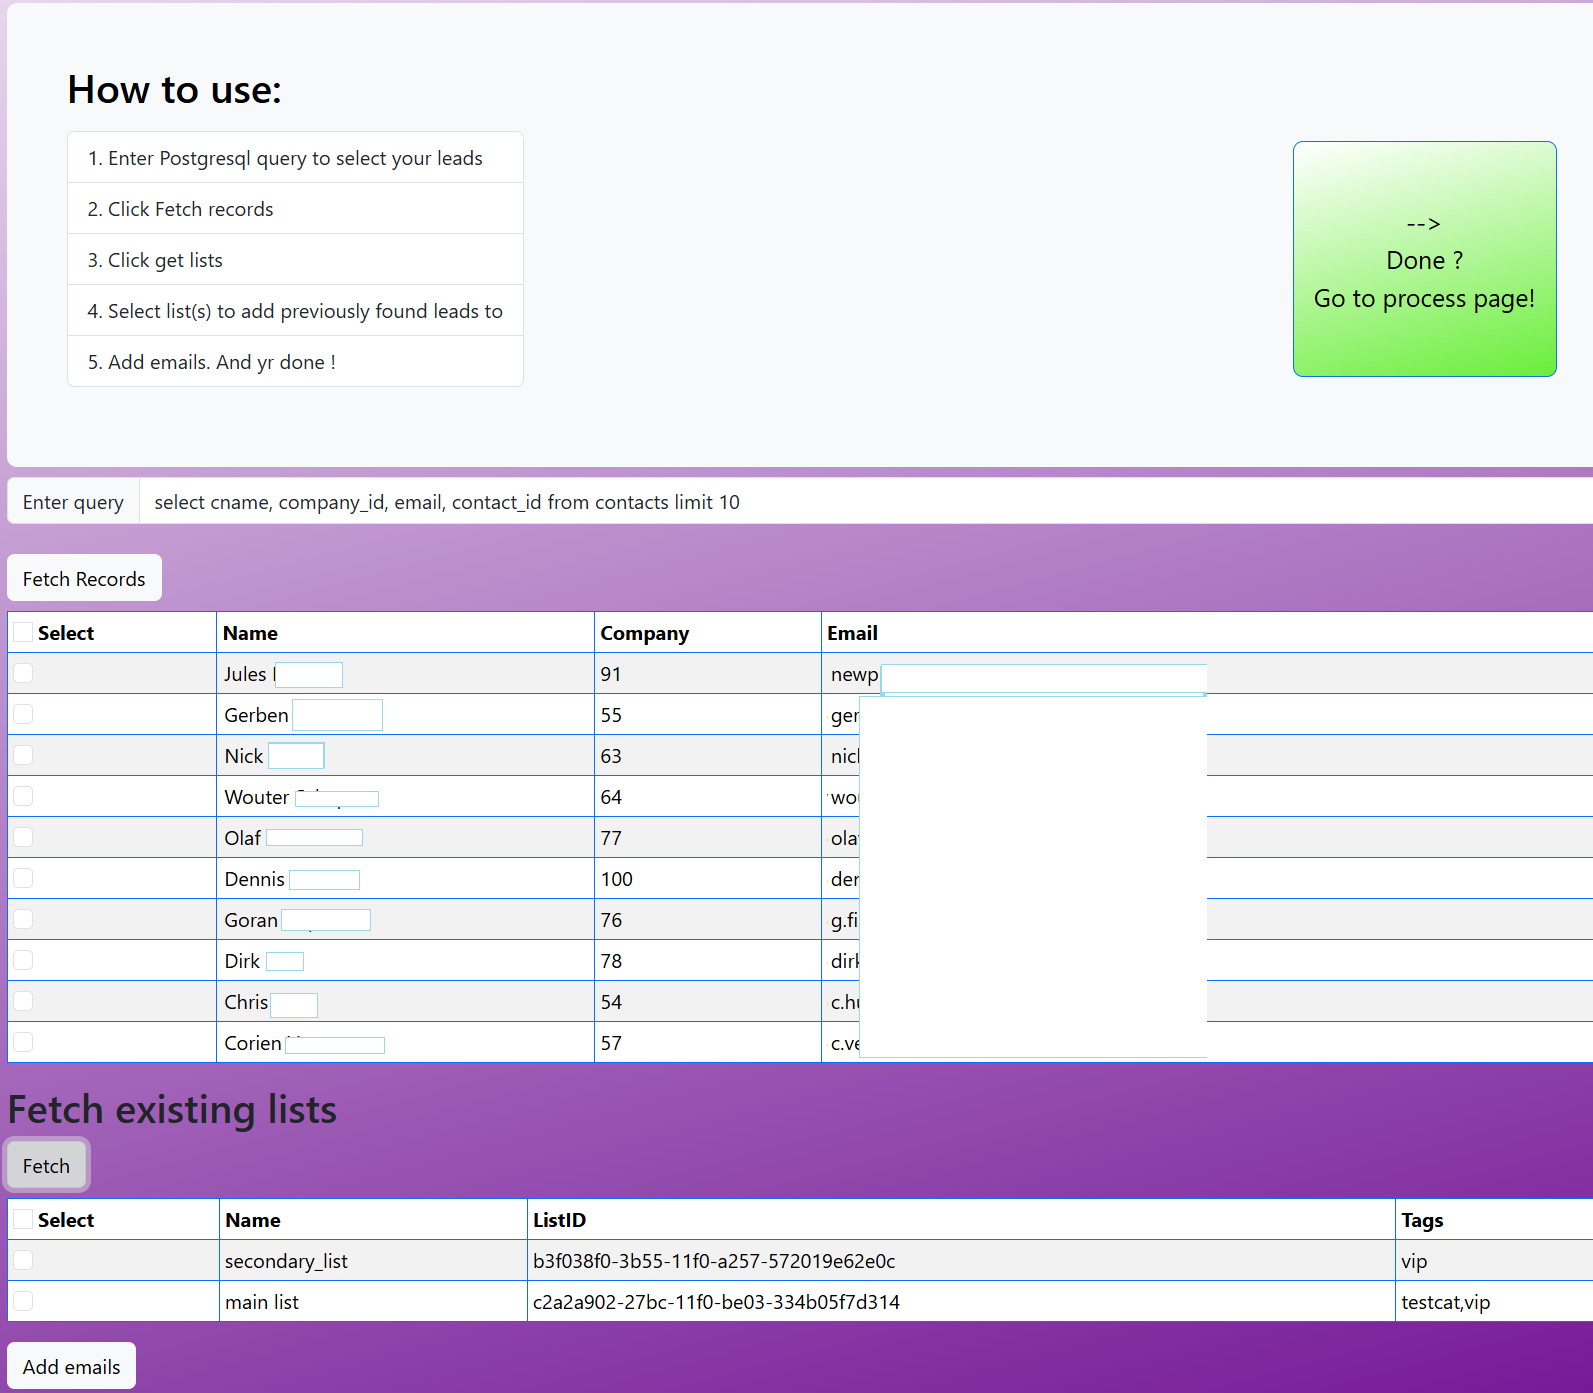
A couple noteworthy points. To get the relevant leads it’s required to issue a regular
sql / postgresql query. An example has been provided in the text area in the UI.
Your query should include the following fields :
- contact_id
- cname
- company_id
- email
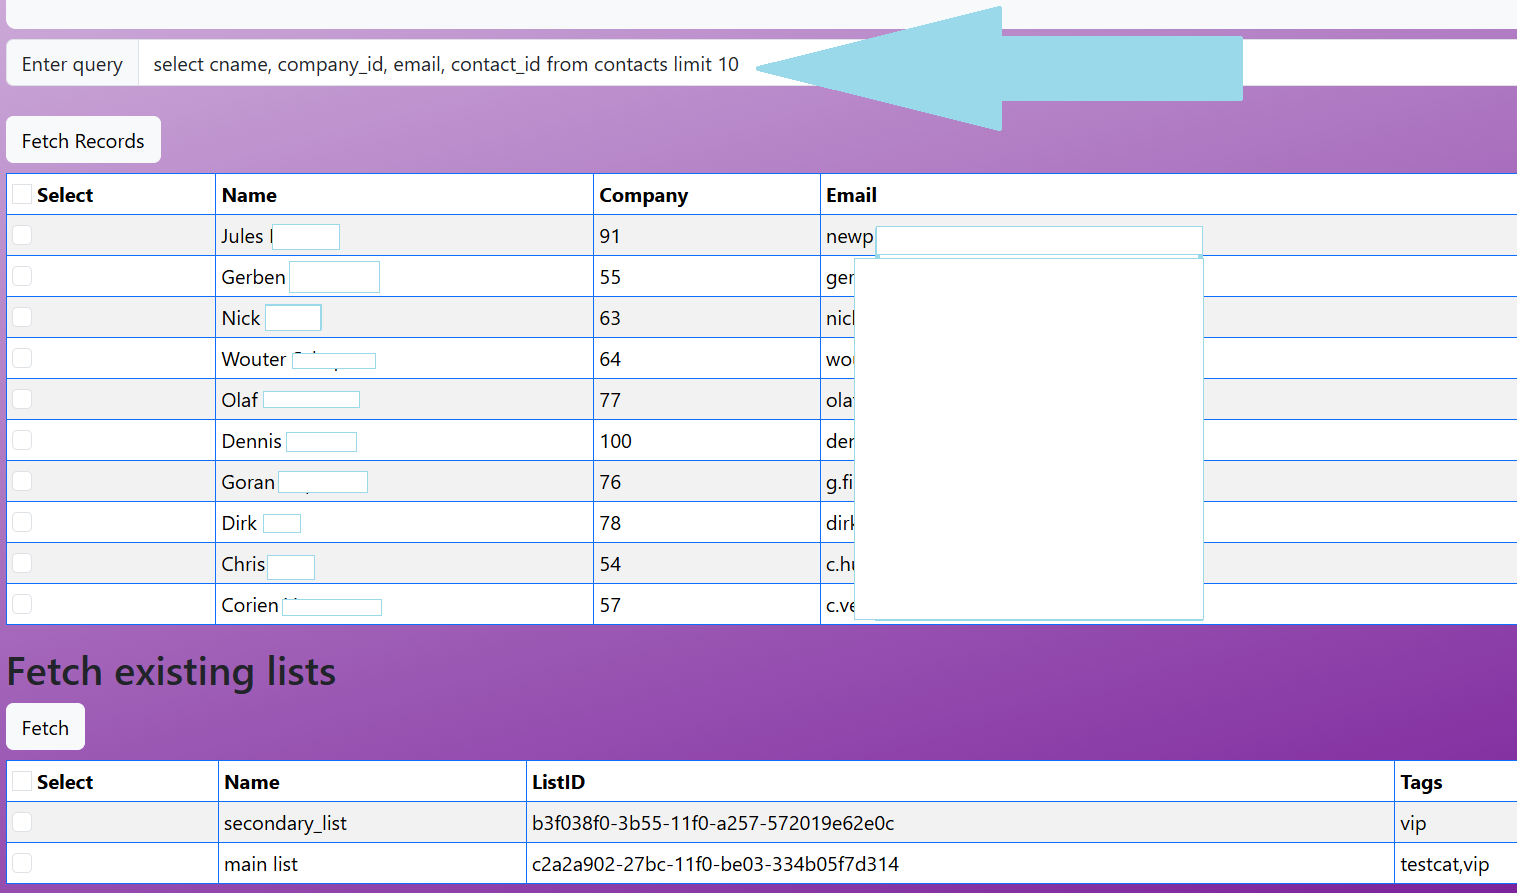
which are used to fill the table. All query records will be added to selected lists. Checkbox functionality to make subselections is left as an exercise for the reader. Alternatively you can minimize the list by querying only cname ,contact_id and email.
In pretty much every scenario where we update elements on the mailocto side, a database update follows. Hence our database will contain complete information of Mail Octo ID’s , and MailOcto ListID/ListName. This ensures our lead database is up to date with all relevant data at all times
In order to elegantly make bulk updates in postgres we choose to use bulk update queries. Which limits network traffic to a single call for every bulk operation. Note: There’s undoubtedly a limit somewhere here. But it hasn’t occurred so far during testing.
Emailoctopus API integration
We connect with the octo using a bearer token that’s provided upon registration. As follows :
Once the connection is established we can query existing lists. (Every contact has to exist within one or more lists).
Once the lists are fetched we can select one or multiple to then enrich with the previously queried database leads. We receive the corresponding contact OctoID in return for each contact.
UI
The UI uses the same previously mentioned pre-compiled handlebars templates. With different data.
Once the contacts are loaded we can move to the campaign page.
Note: It’s mandatory to ‘Fetch lists’ before collecting campaigns. As we need List ID’s to fetch their campaigns. Ofc once can integrate this in the fetch campaign function as well.
After collecting campaigns we have to select 1 ( and only one) campaign, if you select more the first selection will be taken into account and other selections simply discarded.
Processing campaign results.
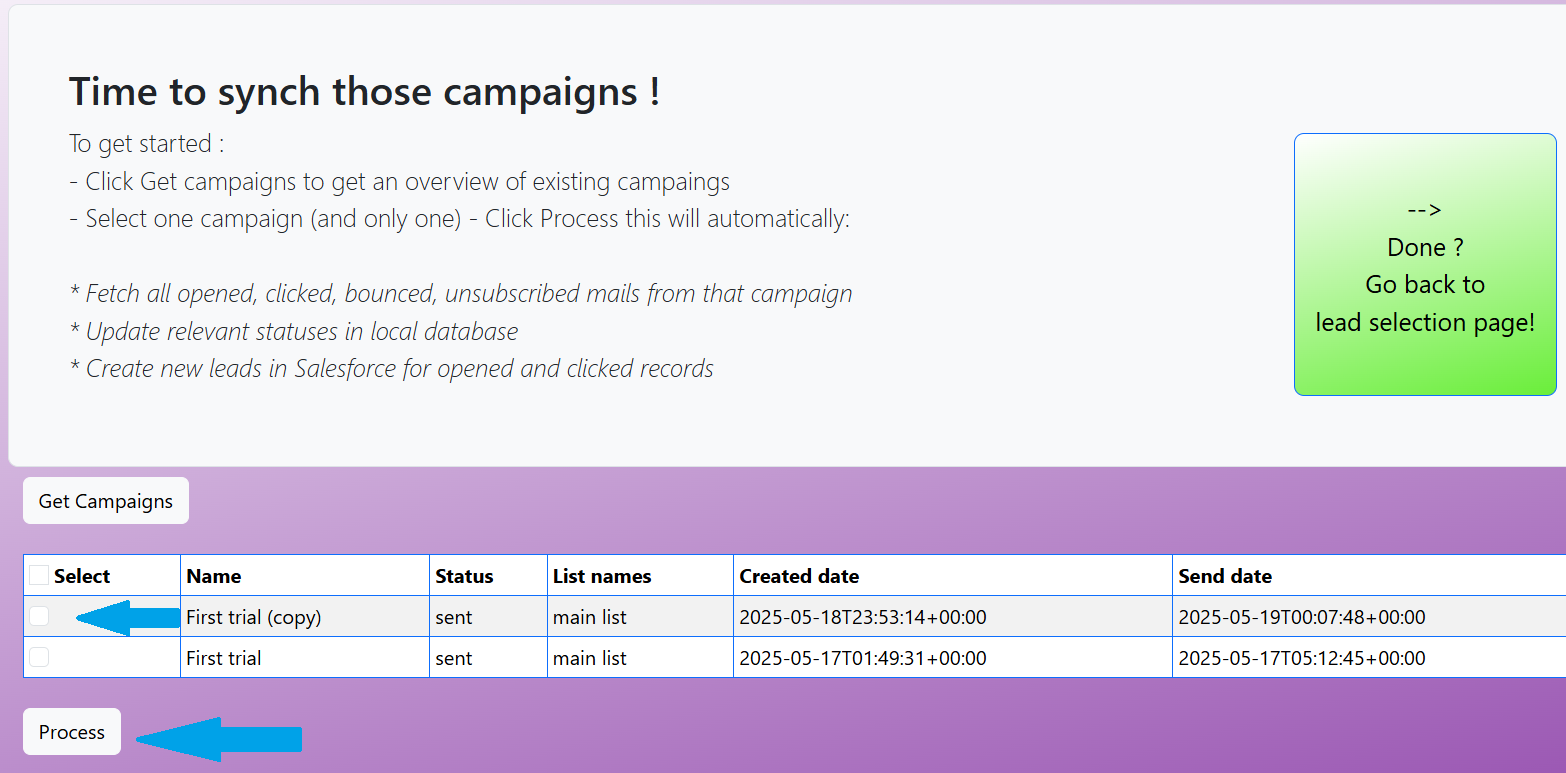
Several things happen here.
- We collect all [clicked,opened, unsubscribed, complain] contact emails from the selected campaign.
- We update the status of all campaign emails in our back-end database
- In case respondents have clicked on links or opened our email we create a new lead in Salesforce
For the sake of this demo we only process clicked and opened messages. In this case will process them to update their status in the dbase. After which they will be added to Salesforce as new leads.
In order to add them to salesforce we first query to enrich the lead data ( company name, city, etc). After which we update relevant details in our camp_Cont table. Once this has completed we use the JSforce library to bulk create new leads in Salesforce.
Jsforce does pretty much all the heavy lifting, allowing for a standard login and bearer token as authentication means. Saving us the trouble of having to implement OAuth2 functionality. Although that might still be advisable.
After processing completes we’ll have fully updated leads in our dbase. As well as new leads in Salesforce for campaign targets that either clicked or opened an email (or both) .
Video with small visual demo is coming soon.
Thanks for coming over. If you like the functionality, but need some tweaks, or just want someone to implement it for you. Get in touch ! And we’ll set it up in your environment to your specifications.